Guest Authored by Jack O’Hanlon
As a long-time user of AGi32 software, I’ve learned to use textures effectively to create images that really reflect the owner’s idea for their lighting performance, and perhaps more importantly, justifying his/her costs for specific higher-performance lighting products. Empirical data often counts of course, but ultimately, it’s more about the ‘finished look’ of a space, particularly so for interior architectural environments.
In my experience, when trying to get the look right, it may take a number of guesses (Tiling, Stretch, Fixed Size, Grid Pattern, etc.) when applying a texture. Some are relatively easy, such as a wall paint finish or inserting artwork into a frame (I always use Stretch), whereas others require a little thought to get the desired effect to accurately render.
Although the AGi Textures Library is extensive, I’m regularly adding textures to ensure a higher quality, more accurate render. If finish details are unknown, I’ll take some design liberties and use my best judgement (“…The rooms will be a light painted finish…”) to apply something. Rendered or raytraced room finishes look much more impressive when you apply a specific Sherwin-Williams paint finish or a Mannington carpet for example, than just using default 80/50/20 reflectances.
If you do use a texture / jpg image from a website, you may find it necessary to edit the image. Typically, if I edit a jpg image, I first save it, then open it in Outlook (simply Right click on the image), go to Edit, which then allows you to resize, crop, alter the color, among other options. If the purpose is to include an artwork in a landscape-oriented frame (i.e, wider than higher), then the image may be cropped at the top and bottom to make it ‘fit’ easily in the frame, and thus appear more effectively in the Render and Raytraced images.
If you’re less than familiar with using textures not found in the Library, you can Browse, or as I often do, Google a particular finish or look (an Armstrong VOC flooring, e.g.) I’m trying to use within a space, save it, and then under Room Edit, apply it to a Floor, Wall, sidewalk, parking surface, etc. Using the most appropriate Render Mode choice (Tiling, Stretch, Grid, or Fixed Size) can sometimes be a matter of trying something to see if it works. With experience, you generally come to know what sort of defaults work best for a given type of project. Note the ‘Stretch’ function works most effectively when the aspect ratio of the Object (in this case, the art frame) matches the image.

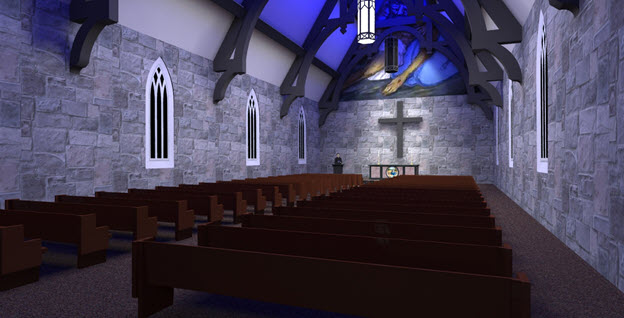
In the Chapel image above, under Room Edit, the stone walls were applied using Fixed Size, 9×9. In this case, we were looking for the ‘large stone’ look, tinkered with the size (smaller and larger than the 9×9), ran the Full Radiosity calc, then viewed the render image. There are times when you simply have to try a few size options to get the look you want.
The pews are from the AGi Objects Library, which were then scaled on the x-axis to create the correct length, while the carpet, Shaw Queen Commercial, Real Time, was applied also using Fixed Size, 3×3. The truss hammer beams, the altar and cross, windows, pulpit in addition to Fr. Murphy, were all SketchUp items included to improve the visual accuracy.

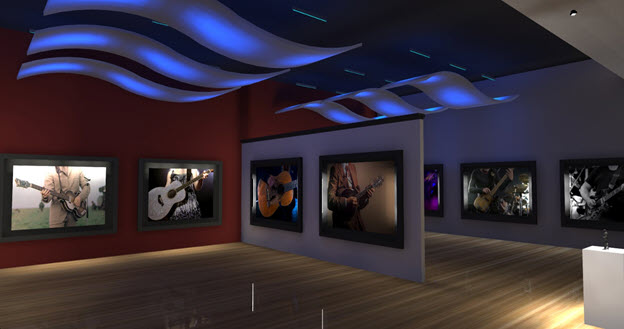
The Gallery image above uses the Stretch function on all the images and paint finishes, and Fixed Size on the wood flooring. You’ll notice the reflected light on the floor, which achieved by applying a small amount of Specularity (in this case, 2%), found in the Room Edit / Floor function. Note too, the color-changing impacts on the transmissive acoustic panels floating above.
As with most software functions, it takes some time to get more familiar with manipulating Textures and effectively applying them to your project designs. As you work with them more frequently, you’ll realize the expanded presentation possibilities are well worth the effort and will deliver that Wow factor you want for the client!
