Perhaps one of the most time consuming aspects of preparing your Revit model for accurate lighting calculations is the process of mapping the “in-use” Revit materials to reasonable surface reflectances. Recall that ElumTools only has access to the Revit material’s “Graphics Shading Color” from which we can calculate a reflectance value. ElumTools does not see the reflectances set by MEP Space for Revit’s lighting estimation routine. If this sounds foreign, please see my previous post: “How Important are Surface Reflectances”.
Because the graphics color may not accurately represent the true real-world surface color, it is necessary to examine all of the Revit materials in use in the ElumTools Material Mapping dialog and “map” each of them to a suitable reflectance value. This process takes not only time, but careful thought.
With ElumTools 2015 (and >2014.7) we have introduced a way to save time by allowing reflectance to be assigned to a Revit “Category” instead of the individual materials within that category. For example: imagine all ceiling types within the “Ceilings” category. Now you can assign one value for reflectance to the Ceilings category and have all ceiling types assume that value. We call it a “Category Override” as it overrides all of the reflectance values calculated from graphics color, as well as those you have set manually for materials in that category.
To use this new feature:
-
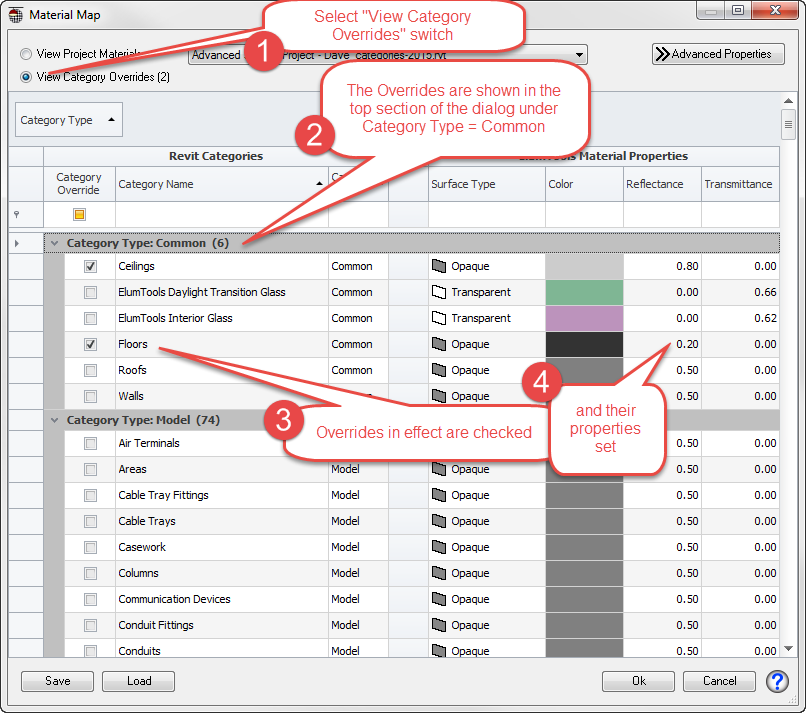
- Open the ElumTools Materials Mapping dialog and click the radio button in the upper left corner to select “View Category Overrides”.
- ElumTools sorts categories and places “Common” categories at the top of the list. As a default this includes Ceilings, Walls, Floors and Glazing; the most popular places to standardize.
- To enable an override by category, simply check the box
- And verify the settings for surface type and reflectance (Advanced Settings can be applied as well but that is another conversation).

This makes it easy to standardize your reflectances for common surfaces, and you can enable and disable an override by just checking or unchecking the box. However, keep in mind that all surfaces that do not make sense to standardize, for example: those red walls in the Conference Rooms, will blow the whole deal. If you have even one member of the category that must be unique, you can’t use an override!
Nifty Tricks
You can filter the category list by typing in the category name area. For example: if you wanted all categories that started with “Flex…”, you would type “Flex” into the Category Name area as shown below and all categories beginning with Flex would be exposed.
 Remove the filter temporarily by unchecking the box in the lower left corner of the dialog. Click the X to end the filter completely. You can edit a filter by retyping in the category name area again, or use the Edit Filter button in the lower right hand corner to make your changes.
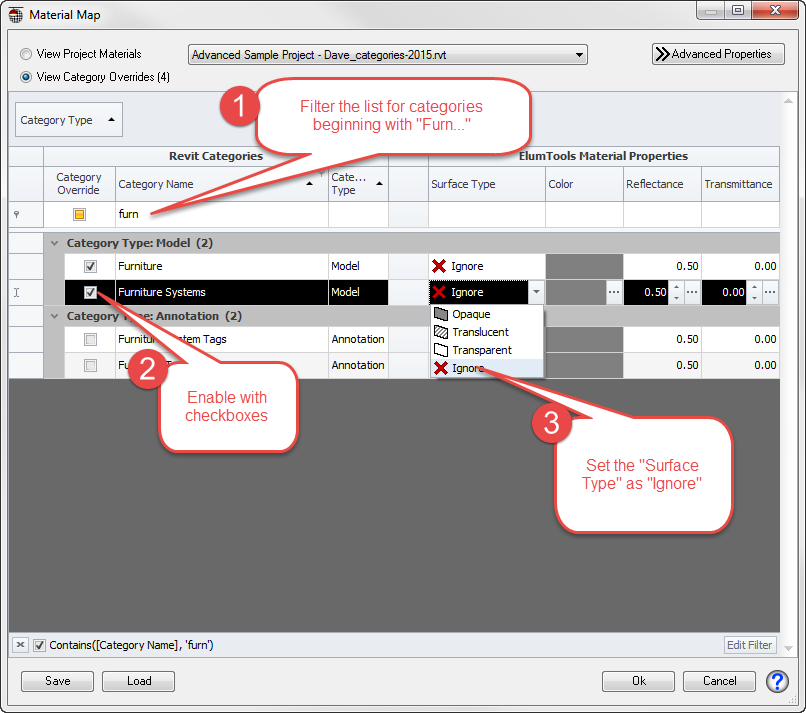
Another handy option is the ability to remove all geometry within a category from the calculations entirely. This can be done in other ways as well, but this method is extremely simple and can be done in seconds. First locate the categories to be ignored. You can do this with a filter or by scrolling the dialog through the category list. As an example, let’s remove all the furniture from the lighting calculations.
- Filter the list for “Furn”
- Check the category boxes to enable the overrides
- Set the Surface Type property as “Ignore”
Any calculations you now execute in ElumTools will have all furniture removed!
Category Overrides can save you tons of time if you are able to take advantage of them in terms of setting standardized reflectances. It is also important to understand that all other surfaces not covered by an override are still utilizing the “Map by Material” method. Make sure their reflectances make sense by shifting the dialog status back to “View Project Materials” in the upper right corner and validating each important material.
Watch our YouTube video on Category Overrides to see it happen and cement in the process!

