Symbol Flexing
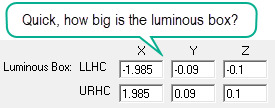
Let’s take a closer look at one of the new features in AGi32 version 20: Symbol Flexing. In the old world (version 19 and earlier), when you selected a photometric file and used Smart Symbols, the symbol flexed to the luminous area, cool. But what happened when you wanted to select a different symbol later? Whoops, the symbol flexing to the luminous area was lost! Bummer. Now you must remember what the size was, or be able to figure it out from the cryptic luminous box dimensions…
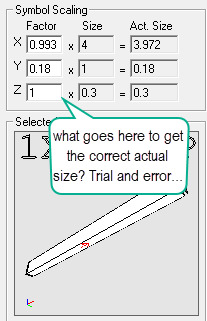
Then you had to do some math to figure out what the multipliers are to make the original symbol the size of the luminous box!
No more! Now when you select a new symbol it will flex to match the luminous dimensions by default. You can disable this behavior with a click and scale yourself, but why?
Let’s see the new symbol assignment process in a few steps.
Step one – Select an IES file and the new Smart Symbols dialog appears. This is a narrow linear pendant luminaire. We have several symbols to select from, they are basic rectangles – but, they flex when selected to match the luminaires luminous dimensions. Notice the new easier to understand luminous box and symbol size areas.
Step two – Now that the luminaire is defined (new Define dialog shown below), suppose we want a different symbol. Click in any of the three symbols areas (see below) to open the symbol selection dialog.
Step three – Now in the symbols dialog, from the Category menu select “Suspended Linear”. Enter “down” in the search field to filter for only luminous down symbol appearance. We will select the “Rectangular Down – LS 4” symbol. Notice it flexes to meet the current luminous dimensions! Sweet. This is done using the Auto Scale checkbox (enabled by default).
Also check out:
- Luminous box is shown in the graphics (red).
- New simple Luminous Box fields of X,Y and Z.
- Model and Render symbol sizing – simplified!
And… Auto Scale will also prevent you from selecting an incompatible symbol for wallwash luminaires that are typically tested with photometric zero (0H) across the short dimension of the luminaire. Smart symbols handles it initially, but if a second symbol was selected in the old v19 (and earlier), you were free to make mistakes.
Pre-tay-cool eh? We think you will like all of the new symbols behaviors!